Difference between revisions of "Tools: Basic wiki skills & palaeographical tips"
m (→Uploading a photograph for your profile) |
m (→Adding to the HCA 13/63 index of deponents) |
||
| Line 59: | Line 59: | ||
(2) Click on the edit button at the top right hand corner of the page to be able to edit the whole page. | (2) Click on the edit button at the top right hand corner of the page to be able to edit the whole page. | ||
| − | (3) Alternatively, click the edit button to the right hand side of each section of ten folios to be able to edit just that section | + | (3) Alternatively, click the edit button to the right hand side of each section of ten folios to be able to edit just that section. |
(4) Take a look at a section which has already had links added to the relevant folios. For example, ff.10r-19v. This will reveal the symbols you will need to use to create new links. | (4) Take a look at a section which has already had links added to the relevant folios. For example, ff.10r-19v. This will reveal the symbols you will need to use to create new links. | ||
Revision as of 05:48, June 18, 2015
THIS PAGE IS UNDER CONSTRUCTION AND IS NOT READY FOR USE
Wiki practice
The best way to learn wiki writing and editing skills is through practice.
Creating a short biography
This week we will practice wiki writing skills by each team member writing a short text profile and uploading a thumbnail photograph to accompany the text. The profiles should be published on the page named Biographies
Writing wiki text
(1) Go to the page named Biographies and click on the edit button in the top right hand corner of the page. You will need to be logged into the wiki with your UserName and Password to be able to get into edit mode. Remember that UserNames and Passwords are case sensitive. Please contact the team facilitator if you have any trouble with your UserName and /or Password.
(2) Type in the text of your profile. Use carriage return and a line space if you wish to separate lines in the text when published.
(3) Make use of bold, underlining and italics as you see fit in your text. To see how to produce those effects go to Sandbox and look at the page in edit mode.
(4) Click "Save page" at the bottom of the page in edit mode to save and publish the text
(5) To change the content, highlighting and layout return to edit mode, make your desired changes and save the page again.
(6) To view earlier versions of the page click "View history" in the top right hand corner of the page
Uploading a photograph for your profile
To upload a photograph you will need to do the following:
(1) Go to the Tools header in the vertical sidebar of the MarineLives wiki and click on "Upload File"
(2) Use the browse option under "Source file" to find the name of the photograph you wish to upload from your computer, and select this file
(3) Click the "Upload file" at the bottom of the "Upload file" window
(4) A new window will open which will display the file you have uploaded
(5) Insert the uploaded file into your profile of yourself using the following expression: [TO BE COMPLETED: ADD THUMBNAIL IMAGE]
Learning editing skills
This week we will learn some basic wiki editing skills, whilst also contributing to the development of the MarineLives wiki in terms of search tools and digital image uploads.
Adding to the HCA 13/63 index of deponents
We have begun to create an online index of deponents (witnesses) for the volume of English Admiralty Court depositions named HCA 13/63. To practice creating text links within the MarineLives wiki, we would like each of you to add to this index.
(1) Go to the index, which you will find at the top the HCA 13/63 summary page, or you can right click on HCA 13/63 Deponents - by folio to open the index in a separate window.
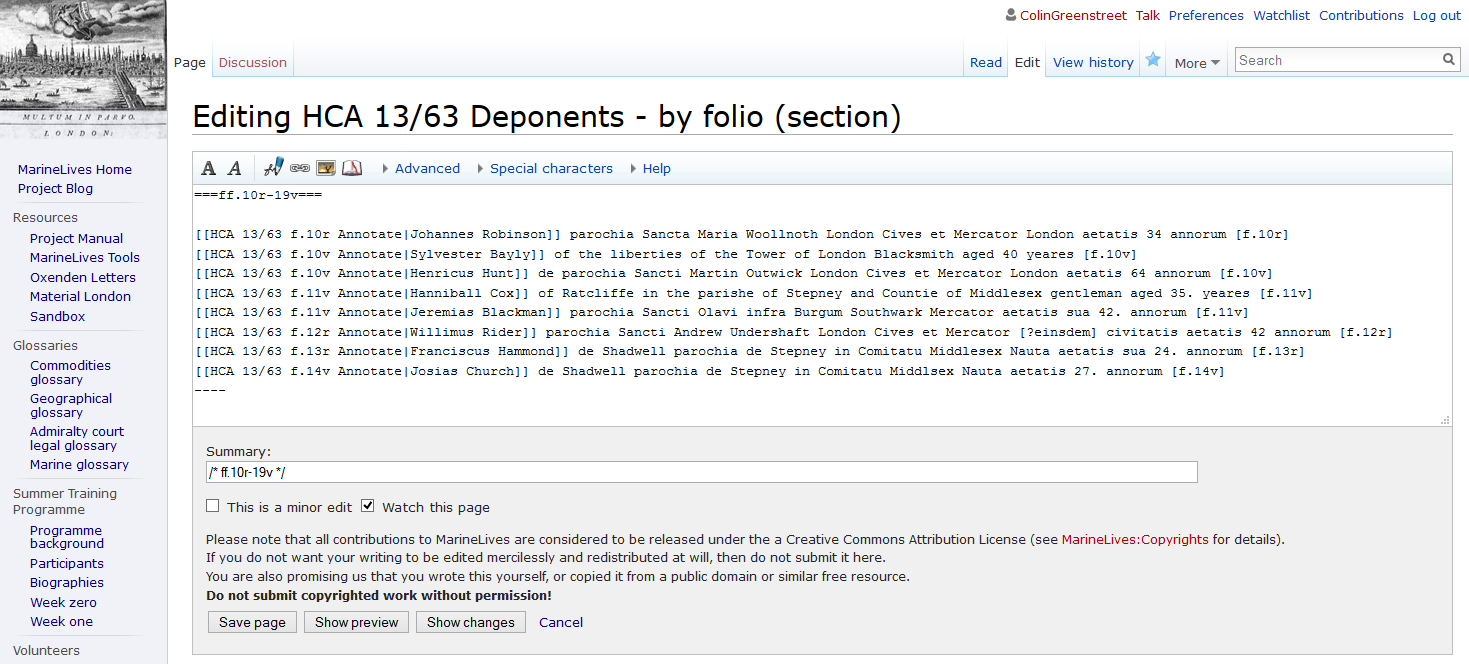
(2) Click on the edit button at the top right hand corner of the page to be able to edit the whole page.
(3) Alternatively, click the edit button to the right hand side of each section of ten folios to be able to edit just that section.
(4) Take a look at a section which has already had links added to the relevant folios. For example, ff.10r-19v. This will reveal the symbols you will need to use to create new links.
[COMPLETE THIS SECTION]
Creating and editing new content pages
The MarineLives wiki uses two types of pages: form based pages and free-form pages. This week we are going to learn how to create a form based page, how to upload a digital image of a manuscript page to that page, and how to add transcribed text to the same page.
(1) You will see in the vertical sidebar in this wiki a section called "Forms", which includes a button called "Create Page". Click on this button and we will create a new Form-based page together.
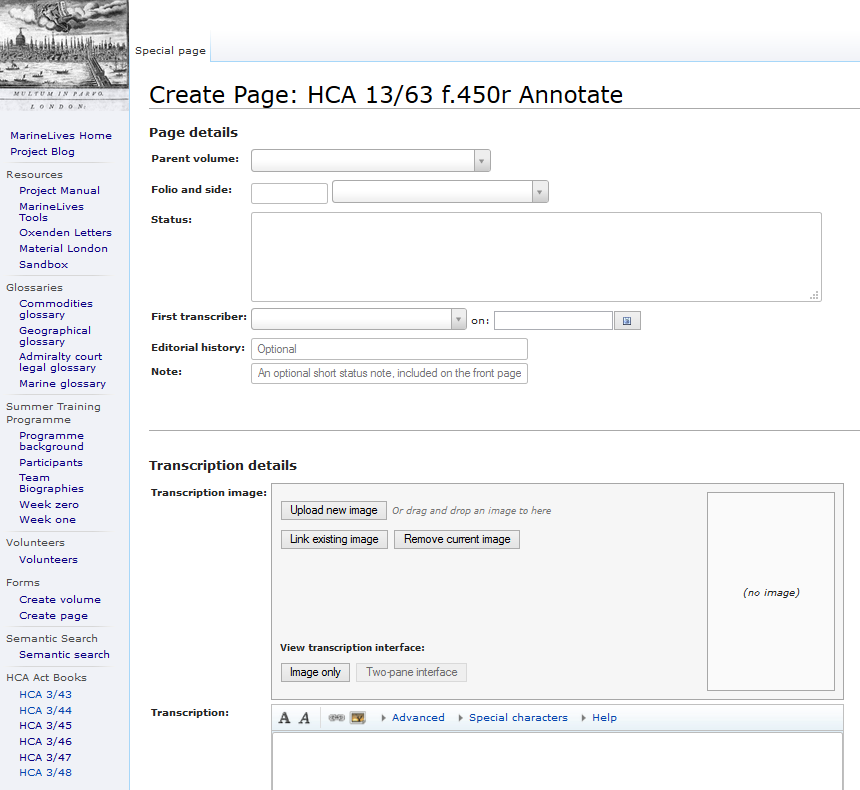
(2) Enter into empty box on the page named "Form:Page" the name of the new page you wish to create and press the "create or edit" button. For example, enter "HCA 13/63 f.450r Annotate". If a page of that name already exists, a window will open displaying that page in edit mode. If there is no page of that name, a window will open with blank fields for "Page Details" and "Transcription details"
(3) Enter the correct data into the blank fields for the "Page details" of the page you are creating.
In the case of HCA 13/63 f.450r Annotate:
Page details
Parent volume = HCA 13/63 (chose from a dxrop down menu)
Folio = 450 (type the number)
Side = Recto (chose from drop down menu)
Status = Type "Requires image" (or if image is being uploaded at same time as page is created type "Uploaded image")
First transcriber = Type "Untranscribed"
On = Leave blank; once first cut transcription has been made select date of transcription from calendar drop down men
Editorial history = Leave blank; add summary text at editorial stage of transcription process
Note = Type "IMAGE: XXXX" and replace "XXXX" with the image ID for the digital image of the manuscript page. In this case "IMG_113_02_6647.jpg"
(4) The image can be uploaded at the time the page is created, or at a later date, after saving the page without the image
(5) To upload a manuscript image, find the correct image ID for the page you are creating, and either drag and drop the image to the "Transcription image" section of the page, or press the button "Upload new image" and browse your computer to find the correct image ID and then upload.
(6) You will see a horizontal bar growing in length across the screen as the image uploads, and when uploaded a thumbnail of the image will appear embedded in the page framework
(7) Scroll to the bottom of the page once the image thumbnail has appeared and press the "Save page" button
(8) Once the image is rendered, you will see the page with the text metadata you have entered and a large thumnail of the manuscript image
Palaeographic tips
[Introduce types of palaeographical challenge in English Admiralty Court records]
[Introduce MarineLives resources to assiste transcribers with palaeographical challenges]
[COMPLETE THIS SECTION]
Introductory reading on the English Admiralty Court
Use input from Dr Richard Blakemore and Dr Philip Hnatkovich
[COMPLETE THIS SECTION]

